ownCloud Android App Available For Download

2:38 AM

ownCloud, the complete, open source cloud file sync tool (includes music streaming, file management which supports sharing, calendar, contacts and more) is now available for Android.

This is the first public ownCloud Android app release and it doesn't have to many features yet, but it does have the basics: browse, upload, download and delete files. The application also supports previews for videos and photos but only for those on your device (which you want to upload) and not for those available on the ownCloud server.

Further more, for now the application doesn't support non-standard ports so if you've configured your ownCloud setup to use such a port, you won't be able to use the Android app for now.

Here are a few ownCloud for Android screenshots:


ownCloud for Android isn't yet available on Google Play, but it should be posted in about 4-6 weeks and around the same time, the iOS app should also be available in the AppStore (for now there's no iOS app available for download).

Download ownCloud for Android (.apk)


More about ownCloud:

0 comments

» read more....

Desktop Syncing Comes To ownCloud Through Mirall And Csync

8:39 PM

ownCloud is a free software alternative to some proprietary web services and it currently includes file management (with built-in file sharing), music streaming, calendar, contacts and more - all running on your computer or server.

Desktop file syncing is now possible with ownCloud, through Csync and Mirall:
  • Csync is a command line synchronization tool that comes with an ownCloud module
  • Mirall is a Qt tray sync client that uses Csync and allows you to synchronize data between the local machine and ownCloud.

Both Csync and Mirall are currently in early beta stages. They can already be used to synchronize your ownCloud, but there are some features that don't work yet, like installing ownCloud straight from Mirall.

For now, there's no file manager plugin so you won't be able to see the current file sync status (emblems) or share files via your file manager. But you can do this using the ownCloud web interface.

A first stable Mirall version is expected to be released with ownCloud 4 and it will be targeting Linux, though Windows might be supported too (it's a second priority).


Here's how to set up Mirall with ownCloud synchronization:

1. Firstly, you must select "Configure" from the tray icon and enter your ownCloud URL address. Selecting "create a new ownCloud" doesn't work for now!


2. Then you must enter your ownCloud username and password:


3. If you've correctly set up ownCloud and entered the correct address in the Mirall configuration, you should now see a "Successfully connected to..." message. Click "Finish":


Please note that at this point, if you select "Configure" again, Mirall won't look like you've already entered the ownCloud URL. This is a display error and if you quit Mirall and start it again, this display error should be fixed.


4. From the Mirall tray icon, select "Add folder", select "Choose" and select a folder that will be used as the local ownCloud sync folder (like the "Dropbox" folder for Dropbox). Then click "Next":


5. On the next (and final) screen, select "to your ownCloud" and click "Finish":


Install Csync and Mirall (in Linux)


Rember, Mirall and Csync are in early beta stages and you'll find bugs. To quote the Mirall announcement on the ownCloud mailing list, "PLEASE DO NOT use in production. IT WILL EAT YOUR FILES!!"

In my test, Csync and Mirall seem to work just fine with ownCloud 0.3, however, the Mirall / Csync beta release announcement states that you should use the latest ownCloud from GIT.

You can get the latest ownCloud from GIT using the following commands:
sudo apt-get install git
cd && git clone git://gitorious.org/owncloud/owncloud.git

Then, install ownCloud.

If you want to test Mirall and Csync in Ubuntu 11.10, (it's not yet available for Ubuntu 12.04), you can install them by using the following commands:
sudo add-apt-repository ppa:zeppelinlg/mirall
sudo apt-get update
sudo apt-get install mirall


The packages in the PPA are a bit older than the latest Mirall/Csync beta, but they should work just fine. Hopefully the PPA will be updated soon with the latest version(s).

Mirall doesn't come with a .desktop file so to launch it, type "mirall" in a terminal.

For Fedora 16 and openSUSE 12.1, get Mirall and Csync from HERE.

To install Mirall and Csync in other Linux distributions, get the source from here: Mirall, Csync.


If you encounter bugs, report them @ http://bugs.owncloud.com/


Update: check out the ownCloud 3 review on yesterday's Linux Action Show episode: Your OwnCloud | LAS | s20e08 (also available on YouTube).

via ownCloud mailing list

0 comments

» read more....

Ubuntu One Gets A New Qt Interface For Ubuntu 12.04 Precise Pangolin

8:27 AM

A new Ubuntuone-Installer version was uploaded to the Ubuntu 12.04 Precise Pangolin repositories today and with it, Ubuntu One has switched to a new Qt interface by default, replacing the old GTK version.

According to a bug report, the Ubuntu One team is no longer supporting the GTK interface so it will be removed soon.

Among the reasons behind this decision are: deprecated pygtk bindings, uniform  interface across all the platforms, usability and others.

UbuntuOne Installer:


And the Qt UbuntuOne Control Panel interface:

Ubuntuone control panel qt Ubuntu 12.04 precise pangolin

Ubuntuone control panel qt Ubuntu 12.04

Currently, there's a bug and launching UbuntuOne from the Unity Launcher, the installer fails. This can be solved by manually installing the Ubuntu One Control Panel Qt interface:
sudo apt-get install ubuntuone-control-panel-qt

The latest ubuntuone-installer package also installs the new Rhythmbox UbuntuOne Music Store plugin, replacing the Banshee one:

0 comments

» read more....

Nuvola Player Adds Built-In Last.fm Scrobbling

2:46 AM

nuvola player

Nuvola Player integrates various cloud music services (Google Music, Grooveshark, Hype Machine and 8tracks) with your desktop: Mpris2 (Ubuntu Sound Menu integration), notifications, multimedia keys, Unity quicklists and more.

The latest Nuvola Player available in the Unstable PPA finally adds built-in Last.fm scrobbling for all the supported cloud music services. Until now, you had to use user scripts for this.

Other new features in the latest unstable Nuvola include: elementary-like AppMenu (can be enabled by selecting View > Only toolbar) and an option to automatically start playback on start-up (if possible).

To install the latest unstable Nuvola in Ubuntu, use the commands below:
sudo add-apt-repository ppa:nuvola-player-builders/unstable
sudo apt-get update
sudo apt-get install nuvolaplayer

Note: the built-in Last.fm scrobbling feature is not yet available for Ubuntu Lucid in the unstable PPA, because the builds failed.

Remember, this PPA is unstable! See also: Stable or Beta Nuvola PPAs (it will take a while until you get the features available in Unstable though).

Arch Linux users can install the latest unstable Nuvola via AUR.

For other Linux distributions: get the code via Launchpad (bzr branch lp:nuvola-player).

0 comments

» read more....

ownCloud 3 Gets Built-In Text Editor, PDF Viewer, Other Improvements

10:39 PM

ownCloud is a free software alternative to some proprietary web services that includes music streaming, file management which supports sharing, calendar, contacts and more:

ownCloud offers the ease-of-use of Dropbox and box.net with a more secure, transparently managed offering. As an open source project ownCloud 3 offers innovative features, a flexible architecture and no vendor lock in.

ownCloud 3 has been released recently with some cool new features, such as:

- Built-in cloud text editor that supports 35 programming languages for syntax highlighting, keyboard shortcuts support, automatic indent and outdent, unstructured / user code folding and live syntax checker (for JavaScript, Coffee and CSS). Editing more advanced file types like .doc and .odt is planned for a future release:

owncloud 3 text editor
ownCloud text editor

- Integrated PDF viewer:

owncloud 3


- Photo gallery application with automatic album generation and dynamic covers:

owncloud 3


Other changes in ownCloud 3:
  • Application Store: support for installing third party applications and addons through a central repository, directly from the ownCloud interface
  • new calendar interface
  • various calendar and contacts improvements
  • A new "external" application that lets you integrate external applications (like an external webmail interface for instance) into the ownCloud interface

The complete list of new features and improvements can be found HERE.

Unfortunately, this release doesn't bring encryption, a desktop sync client or versioning/recovery yet, features which many consider extremely important, but fortunately, all of these features are top priority so hopefully we'll see all of them in a future ownCloud release.


Download / try ownCloud


If you want to try out ownCloud without installing it, head over to http://demo.owncloud.org

ownCloud is available in the official Ubuntu repositories, but that's a very old version (pre version 2) so to install the latest ownCloud in Ubuntu, see our initial post about ownCloud: ownCloud: Your Personal Cloud Server.

Arch Linux users can install ownCloud via AUR, however, at the time I'm writing this post, the package hasn't been updated with the latest ownCloud 3.

Download ownCloud | Update: the ownCloud website seems to be down for now, so here's an alternate download link (via ownCloud @ Twitter).

0 comments

» read more....

Easily Sync Your Local Documents With Google Docs Using Super Flexible File Synchronizer

12:31 AM

Super Flexible File Synchronizer


Super Flexible File Synchronizer is a cloud backup and synchronization tool that supports FTP, SSH, WebDAV, Amazon S3, and Google Docs. The application is cross-platform, but only the Linux version is free (though it's proprietary).

Super Flexible File Synchronizer uses ZIP compression and data encryption and comes with multiple synchronization modes, like Standard Copying, Exact Mirror, and SmartTracking.

Probably the most interesting thing about Super Flexible File Synchronizer is the Google Docs support which you can use to easily synchronize your documents from / to your computer, so any changes you make on Google Docs an be synced with your computer as well as the other way around. The application also supports synchronizing files between two Google Docs accounts, or between any of the supported services / protocols.

You can even can specify which file types to convert when uploading / downloading, by going to Profile Settings > Internet (for the Google Docs side) > Google Docs tab. But of course, the files you sync don't have to be documents and you can sync any file types.


Super Flexible File Synchronizer Linux


The application also features a scheduler, but unfortunately, it's not yet working for the Linux version so for now, you must manually start the synchronization. And there's another feature that doesn't work properly under Linux: file versioning (at least, that was the case in my test). Without these, the application is basically just a simple sync tool, at least for Google Docs which was the only supported service / protocol I've tried, but it's still quite useful if you use Google Docs daily and need to sync files between your computer and Google's cloud documents service.


Using Super Flexible File Synchronizer


Super Flexible File Synchronizer

To get started with Super Flexible File Synchronizer, click the "+" icon to create a new profile, enter a name for your new profile and select the folders you want to synchronize by clicking "Browse" or, to select an online service like Google Docs, select "Internet" - do this both on the left and on the right. Then, simply select the protocol you want to use from the Protocol drop-down: FTP, SSH, WebDAV, Amazon S3 or Google Docs:

Super Flexible File Synchronizer


If you want to use a two-way sync, check the "Copy Right To Left" box too, because only the "Copy Left To Right" is checked by default. Also, make sure you select "SmartTracking" under "Sync Operation Mode.

When ready, click ok and that's about it. If you want to modify the profile, you can do so at any time by selecting it and clicking "Edit".

When you want to sync your newly created profile, simply select it and press the run button from the toolbar (also available via right click on the profile), and the file sync should start.


Download Super Flexible File Synchronizer for Linux (To run it on 32bit, extract the archive and run "SuperFlexibleSynchronizer". For 64bit, you'll find instructions on its Linux download page)

0 comments

» read more....

Ubuntu One Files Now Available For iOS

10:57 PM

ubuntu one files ios

Canonical has released Ubuntu One Files for iOS (iOS4+ only), an application to easily access, sync and share any file on your Ubuntu One account from your iPhone, iPod Touch or iPad.

Just like the Android application, it lets you automatically upload any photos you take using your iOS device to your Ubuntu One account.

You can also rename, delete, publish your Ubuntu One files and so on:

ubuntu one files iphone


I don't have an iOS device so I couldn't test the application. If you do, lets us know how it works for you, in the comments!

Download Ubuntu One Files for iOS (App Store)


via/screenshots: Canonical Voices blog

0 comments

» read more....

Nuvola Player 1.0 (Stable) Released

6:11 AM


Nuvola Player (previously Google Music Frame) is a music player especially designed for cloud music. Even though it's only a "frame", it's a great application that comes with features such as Ubuntu Sound Menu (mpris2 - also works with some GNOME Shell extensions) support, notifications, multimedia keys, Unity quicklists and many extra features thanks to user scripts (like last.fm scrobbling for Google Music, etc.).

Nuvola Player got Grooveshark, Hype Machine and 8tracks support recently (in addition to Google Music) and we've talked about this already, but if you like using stable releases, you'll be glad to know that Nuvola Player 1.0 has finally been released.


Other changes in Nuvola Player 1.0: 
  • a new menu bar and reworked tool bar (and you can select to show them both or only one of them)
  • support for SOCKS proxy servers
  • various configuration options like: turn off notifications, visibility of tray icon, close button behavior, simple settings for user scripts

You can see the official release notes, here.


Install Nuvola Player (stable) in Ubuntu


If you've added the Nuvola Beta or Unstable PPA and want to install Nuvola 1.0 stable, disable them and remove Nuvola, then use the commands below (or use PPA Purge).

To add the Nuvola Stable PPA and install Nuvola Player (stable) in Ubuntu, use the following commands:
sudo add-apt-repository ppa:nuvola-player-builders/stable
sudo apt-get update
sudo apt-get install nuvolaplayer

For Fedora, see: How To Install Nuvola Player (Ex Google Music Frame) In Fedora.

To get the code, report bugs and so on, check out Nuvola Player @ Launchpad.

0 comments

» read more....

How To Install The Native Spotify Linux Client In Ubuntu (With Fixes)

6:49 PM


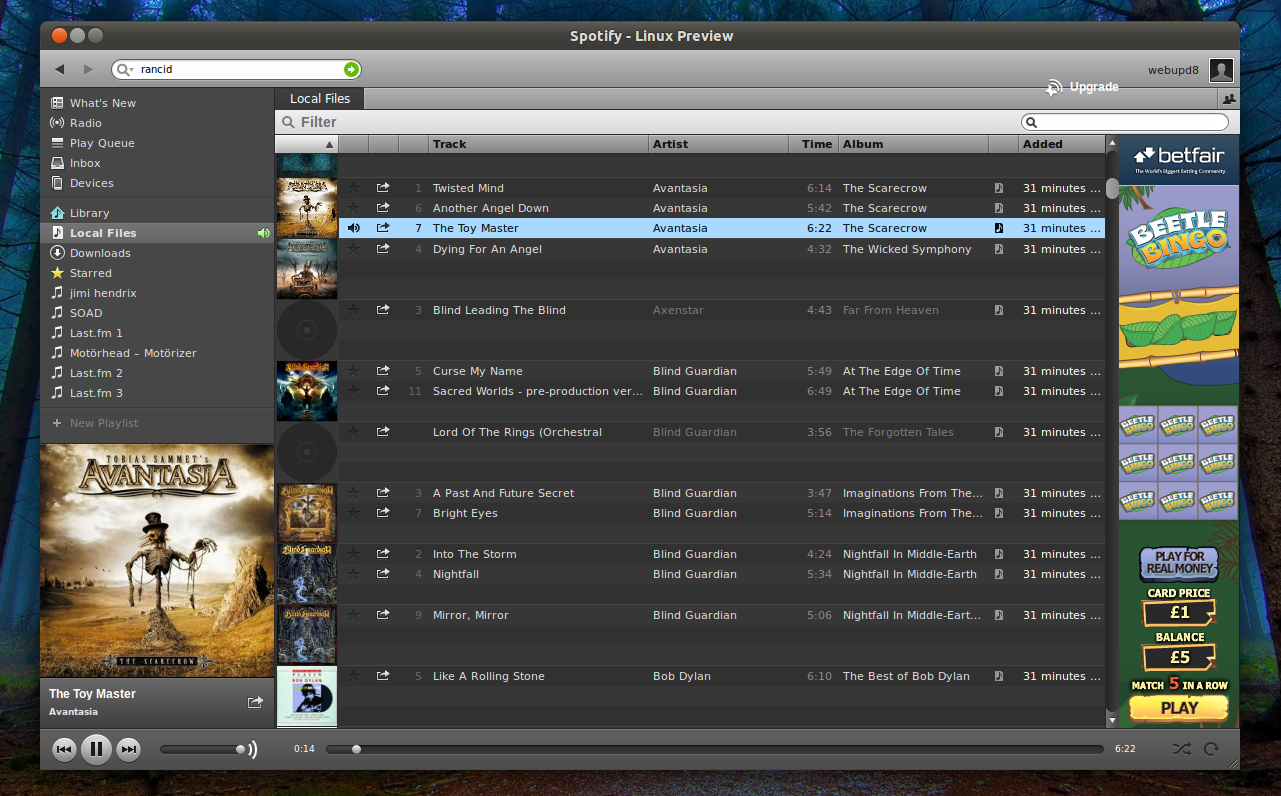
Spotify is a music streaming service that comes with a client which supports Microsoft Windows, Mac OS X, Linux as well as mobile devices such as iOS, Android, BlackBerry, Windows Mobile, Windows Phone, S60 (Symbian), webOS and more. The service is only available in a few countries for now, such as USA, UK, Spain, Sweden and more - check out the Spotify website for more info.

The (official) native Spotify Linux client got support for free accounts recently. Here is how to install it on Ubuntu and fix some bugs such as not being able to play local music in Ubuntu 11.10 Oneiric Ocelot.

Please note that Spotify for Linux is a preview release and is currently unsupported so you may encounter issues!


Install the native Linux Spotify client under Ubuntu


1. Add the Spotify repository (will be used to install Spotify and stay up to date with the latest Spotify versions).

Launch Software Sources using the following command:
gksu --desktop /usr/share/applications/software-properties-gtk.desktop /usr/bin/software-properties-gtk

2. Under Software Sources, switch to the "Other Software" tab, click "Add" and paste the following line:
deb http://repository.spotify.com stable non-free

Once you do this, two repository lines are actually added and the second one (for source code) will display an error when running "sudo apt-get update", so remove this line:
http://repository.spotify.com stable non-free (Source Code)

from the same "Other Software" tab in Software Sources. Once you're done, close the Software Sources window.

3. Import the Spotify repository key and install Spotify for Linux:
sudo apt-key adv --keyserver keyserver.ubuntu.com --recv-keys 4E9CFF4E
sudo apt-get update
sudo apt-get install spotify-client-qt


Spotify fixes for Ubuntu


Spotify has been installed, but if you are using Ubuntu 11.10 Oneiric Ocelot (or newer), you can't play local music, or at least some file types don't work and you'll get a sound decoder error:

"There is a problem with the sound decoder. Spotify can't play music"

This may even occur for some Spotify tracks.

To fix this, you need to install libavutil50, libavcodec52 and libavformat52 from the Ubuntu 11.04 Natty Narwhal repository. To make it easier (thanks to yugnip!), you can get all 3 from here:

Download the .debs above in a new folder, then use the terminal to navigate to it ("cd /path/to/folder") and run:
sudo dpkg -i *.deb


Another annoyance is that Spotify for Linux doesn't display any artwork in the Ubuntu Sound Menu, at least in Ubuntu 11.10. To fix this, use the command below:
mkdir -p ~/.cache/indicators/sound/album-art-cache

Unfortunately I didn't found a fix for the out of place "Upgrade" button.


via PinguyOS forum; thanks to Antoni "Pinguy" for the tip!

1 comments

» read more....

Google Music Frame Renamed To Nuvola Player, Grooveshark (Free) Support Added To The Latest Development Builds

5:05 PM

Nuvola Google Music Frame grooveshark

Google Music Frame used to be an application that integrates Google Music in Ubuntu, providing sound menu support, notifications, multimedia keys and even last.fm scrobbling.

But the application has evolved and the latest development builds work with Grooveshark too. Because it now supports two music services (more cloud music services might be added in the future), Google Music Frame has been renamed to "Nuvola Player".


Since the Grooveshark integration is very new, it doesn't support all the features that were available for Google Music yet: for instance, you can't use user scripts yet (so no last.fm scrobbling for now) Last.fm scrobbling support is actually built into Grooveshark now (as long as you log in).

But there's something very cool about the Grooveshark support: because the website is embedded into the application, you don't need a Grooveshark paid subscription to use it (you don't even need to create an account if you don't want to)! Also, the Ubuntu Sound Menu / GNOME Shell Mediaplayer integration,  multimedia keys or notifications already work for Grooveshark.


Nuvola gnome shell
(Google Music Frame / Nuvola Player in Ubuntu 11.10 with GNOME Shell Mediaplayer extension)


Grooveshark support should land in Nuvola PLayer 0.4, but if you want to try it in Ubuntu already, you can install the latest Nuvola development build from its (new) unstable PPA - available for Ubuntu Lucid, Maverick, Natty, Oneiric and Precise:
sudo add-apt-repository ppa:nuvola-player-builders/unstable
sudo apt-get update
sudo apt-get install nuvolaplayer


To install Nuvola / Google Music Frame in Fedora, see our previous post (note: not tested with the latest dev builds): How To Install Google Music Frame In Fedora.


Switching between Google Music / Grooveshark can be done by clicking the "Switch service" button on top:

Nuvola switch between services

If you encounter bugs, report them @ Launchpad.

0 comments

» read more....

SparkleShare Finally Available For Android

6:19 PM

Sparkleshare is an open source tool to synchronize your files in the cloud that supports GitHub, Gitorious or your own private GIT server.

SparkleShare finally got an Android application that allows you to connect to your SparkleShare server. For now, the application can only be used to browsing/downloading files:

SparkleShare Android

SparkleShare

To be able to connect SparkleShare for Android with your SparkleShare server, you need to set up SparkleShare Dashboard, a web interface for SparkleShare. Instructions on getting SparkleShare Dashboard to run can be found HERE.

Note for Ubuntu users: SparkleShare Dashboard requires nodejs >= 4 so if you use an Ubuntu version older than Oneiric, use THIS PPA to install nodejs.

Once you've installed SparkleShare Dashboard, linking your device is very easy and all you must do is scan a QR code generated by SparkleShare Dashboard.


Download SparkleShare for Android (Market link) | SparkleShare homepage

0 comments

» read more....

ownCloud: Your Personal Cloud Server

1:53 AM

ownCloud is a free software alternative to some proprietary web services and it currently includes file management (with built-in file sharing), music streaming, calendar, contacts and more - all running on your computer or server..


ownCloud 2 was released a few days ago and comes with many cool new features:
  • WebDAV support so you can access your files through filemanagers like Nautilus or Dolphin and even iOS or Android (using third-party apps)
  • share files with a click
  • calendars and contacts which can be connected to Thunderbird, Kontact or Evolution
  • Music streaming (through Ampache server)

ownCloud 2 also comes with a new look. Here are some screenshots:

ownCloud
Sharing a file

ownCloud music
ownCloud - music

owncloud calendar
Calendar

owncloud apps
ownCloud applications (plugins)


Mini review


The best thing about ownCloud is that you can have all your files (music, pictures or whatever) with you all the time, no matter what device you use. And you have all the space you want since you are using your own computer/server.

The music streaming is also a very useful feature. You basically have your own Google Music server without the restrictions imposed by Google. And you can use a complete music player for this such as Amarok, Tomahawk, Banshee (through "banshee-extension-ampache" extension) and others.


One downside is that the interface is not mobile friendly and because the download and share links only show up on hover, these features don't work using some mobile browsers (like the stock Android browser). But it works just fine using a browser such as Firefox and further more, there are some WebDAV Android clients out there so this is not such a big issue. But having a mobile-friendly interface would be nice.

Another downside I've encountered while testing ownCloud 2 is that it's kind of slow when trying to access a folder containing a large number of files (like the folder where I store all my photos). But this might be related to my computer/configuration.

Also, ownCloud currently lacks some features like encryption, versioning or a desktop sync tool. But these features are on the way. Some features are already in development: online text editor, task manager, encryption, a desktop sync client, Android and webOS applications and more. Versioning, recovery and connecting to other services are planned too.

Oh, and you can even write your own apps for ownCloud.


Try ownCloud 2


If you want to try ownCloud before installing it, simply go to http://demo.owncloud.org/ .


Install ownCloud 2


The latest ownCloud 2 isn't available in the official Ubuntu repositories so you must install it manually.


1. Install the ownCloud 2 dependencies:

sudo apt-get install apache2 php5 php-pear php-xml-parser php5-sqlite php5-json sqlite php5-mysql mp3info curl libcurl3 libcurl3-dev php5-curl zip php5-gd

2. Download ownCloud and copy it to /var/www/. Presuming you've downloaded it in your home folder, use the commands below to extract and move it to /var/www/:
cd
tar -xvf owncloud*.tar.bz2
sudo mv owncloud /var/www/owncloud

3. Set up the permissions:
sudo chown -R www-data:www-data /var/www/owncloud

4. Restart Apache:
sudo /etc/init.d/apache2 restart

5. Open a browser and enter http://localhost/owncloud - if you get an error similar to this: "No database drivers (sqlite or mysql) installed.", restart your computer and the error should be gone.


Owncloud create account

Ok, now back to: http://localhost/owncloud - here you'll be prompted to enter a new admin username and password and you're done!

If you get an error similar to the following:

Could not open /var/www/.well-known/host-meta for writing, please check permissions!

after creating your username and password, run the following commands:
sudo mkdir  /var/www/.well-known
sudo touch /var/www/.well-known/host-meta
sudo chown -R www-data:www-data /var/www/.well-known/

These instructions* can also be found @ ownCloud's website, along with Arch Linux, openSuse, Fedora, CentOS, Gentoo, Mac and Windows installation instructions.


* the instructions in this are slightly different for Ubuntu; for instance, I was getting the "No database drivers (sqlite or mysql) installed" error if trying to only install php5-sqlite but this was fixed by installing php5-mysql too, etc.


Connect to ownCloud using Nautilus (WebDAV)


In Nautilus, select File > Connect to server. In the "Type" drop-down, select "WebDAV (HTTP)" and:
  • under "Server" enter "ip/owncloud" (where "ip" the IP address of the computer where you've installed ownCloud or "localhost" to set it up on the same computer as ownCloud)
  • under "Folder" use "/files/webdav.php"

ownCloud Nautlus WebDAV

Then enter your username and password and that's it:

ownCloud nautilus webdav

For advanced WebDAV use, see: http://owncloud.org/use/webdav/


Increase the maximum allowed file size


By default, you can't upload files larger than 2 mb to ownCloud. To change this you need to edit /etc/php5/apache2/php.ini:
gksu gedit /etc/php5/apache2/php.ini

In this file, search for:
upload_max_filesize
post_max_size

And change their value to whatever you want. Then save the file and restart Apache:
sudo /etc/init.d/apache2 restart

Thanks to Jan-Christoph Borchardt for the tip!

0 comments

» read more....

Dropbox Share Updated For Ubuntu 11.10 [Fedora Installation Instructions Too]

5:37 PM

Dropbox Share is now available for Ubuntu 11.10 Oneiric Ocelot. This is a tool I've created a while back to easily share files or folders using Dropbox and automatically copy their public links to the clipboard.


Dropbox Share comes with a custom Unity launcher as well as two Nautilus scripts (so you don't have to use Unity to run Dropbox Share):

- custom Unity launcher (works with docks too!): just drag and drop some file(s) or folder(s) onto the launcher and a simbolic link is created into your public Dropbox folder (and thus, it doesn't use the double amount of disk space like it would do if you'd copy the files). The public share links are automatically copied to the clipboard so you can easily share it with your friends, etc:

Unity Dropbox Share

- Two Nautilus scripts to share and unshare files - they work just like the Unity launcher, but work in Nautilus and don't require Unity or a dock:

Dropbox Share


Further more, Dropbox Share also adds an emblem to the shared files so you know which files you've shared. And even if you remove a file manually (without using the unshare script) from your public Dropbox folder, the emblems will be correctly updated the next time you share a file thanks to a history of shared files that's built into Dropbox Share.


Also, like I said, Unity Dropbox Share also works with docks such as Avant Window Navigator, Cairo Dock or Docky - just drag the icon to the dock and then drag and drop files to share them using Dropbox. Unfortunately, it doesn't work with DockBarX.


Besides Ubuntu Oneiric support, the latest Dropbox Share 0.5.5 also comes with a new feature: Unity quicklist to re-copy the URL for the last shared file as well as bug fixes.


Here are two old videos demoing Dropbox Share:

- Dropbox Share Nautilus scripts:


- Unity Dropbox Share (Unity launcher):


Install Dropbox Share in Ubuntu


Before proceeding, make sure you've installed Dropbox!


1. Dropbox Share is available in the main WebUpd8 PPA, for Ubuntu 11.10, 11.04, 10.10 and 10.04. Add the PPA and update the software sources using the following commands:
sudo add-apt-repository ppa:nilarimogard/webupd8
sudo apt-get update

2. 

Now, install Dropbox Share (Nautilus scripts):
sudo apt-get install dropbox-share

To also install Unity Dropbox Share (custom Unity launcher), use the following command:
sudo apt-get install unity-dropbox-share

The Unity Dropbox Share icon isn't automatically added to your Unity launcher so you'll have to add it manually it: open Nautilus and navigate to /opt/unity-dropbox-share/, then drag and drop the icon to the Unity launcher or Cairo Dock, AWN, Docky, etc.

Now you can share files or folders using Dropbox by right clicking in Nautilus and selecting Scripts > Dropbox Share or by drag'n'drop onto the custom launcher.


Install Dropbox Share in Fedora


Please note that the emblems do not work in Fedora 15 due to a bug in Nautilus 3 which doesn't read file emblems from metadata (the bug has been fixed in Nautilus 3.1.92 which is in Oneiric).


You firstly need to install Dropbox (obviously)!

1. Install the required dependencies:
sudo yum install libnotify xclip xautomation gvfs libsqlite3x python bzr

2. Download and install Dropbox Share:
cd
bzr branch lp:dropbox-share
sudo cp dropbox-share/bin/* /usr/bin/
sudo chmod +x /usr/bin/{dropbox-index,openpublicfolder,recopy-url,unity-dropbox-share}
mkdir -p ~/.gnome2/nautilus-scripts
cp dropbox-share/{"Dropbox Share","Dropbox Unshare"} ~/.gnome2/nautilus-scripts/
sudo mkdir -p /opt/unity-dropbox-share
sudo cp dropbox-share/etc/* /opt/unity-dropbox-share
rm -r dropbox-share

If you want to use the Dropbox Share launcher in a dock such as AWN or Docky, open Nautilus and go to /opt/unity-dropbox-share and drag the Unity Dropbox Share icon onto a dock.

Now you can share files/folders using Dropbox by right clicking them in Nautilus and selecting Scripts > Dropbox Share or by drag'n'drop onto the custom launcher.


Report any bugs you may find @ Launchpad.

0 comments

» read more....

"Ubuntu One Files": Free Ubuntu One App For Android

2:26 AM

Canonical has just released a free Ubuntu One application for Android devices.

The application is called "Ubuntu One Files" and it not only lets you access your Ubuntu One files but it also lets you instantly upload any photos you take to your Ubuntu One account. In fact, the first time you run it, a pop-up screen will ask you if you want to automatically upload existing photos or future photos to Ubuntu One:

Ubuntu One Android


The application also lets you upload new files and create new folders, rename, delete or publish your files. You can also share your files on Facebook, Twitter, Flickr and so on. For this, simply tap and hold on a file and the options window should pop up:

Ubuntu One Files Android App

Ubuntu One Android app


By default, Ubuntu One File lists all your existing Ubuntu One files but it doesn't automatically download them. To download them on your device you must click the files:

Ubuntu One Android


Installation


Ubuntu One Files is open source so if you want to check out the code, see its Launchpad page.

To install it, visit Ubuntu One Files on the Android Market or use the QR code below:

Ubuntu One Android install

Since this is the first public release, expect to find bugs. You can report them @ Launchpad.


Note: in my test, authenticating with Ubuntu One through Opera failed so you may want to try this using a different browser (the stock browser worked just fine) - at least that was the case on my HTC Desire HD on which I've tested it.

0 comments

» read more....

LibreOffice Google Docs Sync Addon "Ooo2gd" Now Lets You Upload Files Without Converting

12:25 AM

A while back we wrote about an OpenOffice addon called "Ooo2gd" which lets you synchronize your documents with Google Docs, Zoho and WebDav servers (either manually - when you're done editing the file, or automatic sync; you can also import files that are already available on the server).


LibreOffice upload to Google Docs

Well, you'll be glad to know that Ooo2gd works with LibreOffice too. Also, the latest Ooo2gd version (3.0.0), released earlier this month comes an option to upload to Google Docs without converting the files (so you can keep the original file format).


Note: Because Google Docs (and its API) is still in beta, sometimes you may not be able to log in to your account. Usually, this happens with Google Apps accounts and it doesn't seep to happen with regular Google accounts but still, if you're getting a login error, most probably this is the case.


Install LibreOffice / OpenOffice.org Google Docs sync addon "Ooo2gd"


Before proceeding, please note that I've tested the instructions below with LibreOffice from the Ubuntu repositories / the LibreOffice PPA so the instructions may not work if you've manually installed the LibreOffice .deb files downloaded from the LibreOffice website!


To use Ooo2gd with LibreOffice or OpenOffice.org in Ubuntu, follow the steps below:

1. You need to install Sun Java from your Linux distributions repositories.

In Ubuntu, enable the partner repository and then search for "sun java6" in Ubuntu Software Center or Synaptic or use the command below to install it:
sudo apt-get install sun-java6-jre sun-java6-plugin

2. For LibreOffice, install "libreoffice-java-common":
sudo apt-get install libreoffice-java-common

For OpenOffice.org, run the command below:
sudo apt-get install openoffice.org-java-common

3. Close LibreOffice / OpenOffice, download the latest ooo2gd in your home folder (~/) and run the following command in a terminal:
unopkg add ~/ooo2gd_3.0.0.oxt


LibreOffice Google Docs sync

Once installed, open Libreoffice Calc, Writer, etc. and you should see a new floating toolbar which you can use to upload your documents to Google Docs, Zoho or a WebDav server.

I recommend using your full email address as the username for Google Docs because in my tests, using the username only sometimes fails.

Now use the new toolbar (which you can drag to your main toolbar) to sync files with Google Docs or Zoho - once you click the "upload" button, a dialog will pop-up and you'll have to enter your username and password. There are also some options available here, like keeping the files in sync (automatically), convert to Google Docs format, etc.

If you're not seeing the floating toolbar or you've encountered some other issue when installing Ooo2gd, check out the known issues page.

0 comments

» read more....

Stable SparkleShare (0.2) Released With Pluggable Backend, Mercurial Support [Cloud Sync Tool]

8:32 PM

SparkleShare

Sparkleshare is an open source tool to synchronize your files in the cloud and it can use a GitHub, Gitorious or your own private GIT server. For now, SparkleShare is easy to install under Linux and Mac, "but it’s hard to get running and it doesn’t integrate well with the system" on Windows, says Hylke, the SparkleShare developer. Android and iPhone clients might be released in the future too.

The first stable Sparkleshare version (0.2) was released earlier this month, getting a pluggable backend and experimental Mercurial support. This means it might get support for other protocols in the future, like SFTP, etc.


Other changes in the SparkleShare 0.2:
  • Added support for Growl to show notifications on Mac.
  • Removed the dependency on GitSharp.
  • File rename detection support in the event logs.
  • Fixed all crashes reported in RC1 and improved sync algorithm.
  • Redid collision detection and conflict resolving (use a copy of each version).
  • Improved about dialogs with version checking.


Install SparkleShare


There is a new stable SparkleShare Ubuntu PPA, available for Ubuntu 11.10, 11.04 and 10.10. Add it and install SparkleShare using the commands below:

mkdir -p ~/.ssh
sudo add-apt-repository ppa:warp10/sparkleshare
sudo apt-get update
sudo apt-get install sparkleshare libwebkit1.1-cil git-core

The "mkdir -p ~/.ssh" command is required because if the ~/.ssh folder doesn't exist, SparkleShare crashes.

For Nautilus integration, also install "python-nautilus":
sudo apt-get install python-nautilus

Once you install this package (for some reason, it's not automatically installed by SparkleShare), you can get previous versions of a file or copy its web link. Unfortunately, at least in Natty, the sync status file emblems are not displayed (and I've tested it on two Natty computers).

SparkleShare Nautilus


SparkleShare notification area icon

This stable SparkleShare PPA doesn't provide an AppIndicator for Ubuntu. But there's a daily builds PPA "ppa:terminus/ppa" from which you can install SparkleShare with AppIndicator support (but remember, this PPA is unstable!). After an update, the stable SparkleShare PPA provides an AppIndicator too.


There's also a SparkleShare Fedora repository @ http://repos.fedorapeople.org/repos/alexh/sparkleshare/

For Mac binaries and source files, see the SparkleShare homepage.


Setting up SparkleShare is not very complicated, but there are a few things you must do to get it working. But we've already covered this, so check out the following posts:

Also see: how to encrypt files before syncing in SparkleShare (for an easier way, you can use EncFS like in this post).


0 comments

» read more....