ownCloud Android App Available For Download

2:38 AM

ownCloud, the complete, open source cloud file sync tool (includes music streaming, file management which supports sharing, calendar, contacts and more) is now available for Android.

This is the first public ownCloud Android app release and it doesn't have to many features yet, but it does have the basics: browse, upload, download and delete files. The application also supports previews for videos and photos but only for those on your device (which you want to upload) and not for those available on the ownCloud server.

Further more, for now the application doesn't support non-standard ports so if you've configured your ownCloud setup to use such a port, you won't be able to use the Android app for now.

Here are a few ownCloud for Android screenshots:


ownCloud for Android isn't yet available on Google Play, but it should be posted in about 4-6 weeks and around the same time, the iOS app should also be available in the AppStore (for now there's no iOS app available for download).

Download ownCloud for Android (.apk)


More about ownCloud:

0 comments

» read more....

TV-Maxe 0.07 Released, Ubuntu PPA Available [SopCast Player For Linux]

10:36 PM

tv maxe sopcast player

TV-Maxe is an application that you can use to watch TV stations online, through a P2P technology called SopCast. It comes with two TV channel lists by default: one international and one Romanian, but more unofficial lists are available on its wiki (for France, Hungary, United Kingdom, Danmark, Spain, Russia and Ukraine).


TV-Maxe 0.07 has been released recently, bringing some important changes both under-the-hood as well as to the end users:
  • HTTP remote control: TV Maxe already had support for remote control via infrared, but the latest version also comes with HTTP remote control so all you need is a mobile phone or tabled with a working network connection to change TV channels, play/stop TV maxe and change or mute the volume.
  • Gstreamer support which is more stable than the Mplayer or the VLC backends
  • Separation of protocol engines and multimedia backends
  • Faster startup
  • Support for streams with multiple audio tracks
  • Added support for multiple Sopcast sources for the same channel
  • Channel list filtering
  • Deleted channels management
  • Extended support for RTMP streams


Install TV-Maxe (SopCast Player) in Ubuntu


To install the latest TV-Maxe in Ubuntu 12.04, 11.10, 11.04, 10.10 or 10.04, use the commands below:
sudo add-apt-repository ppa:venerix/blug
sudo apt-get update
sudo apt-get install tv-maxe

For .rpm and source files, see the TV-Maxe downloads page.

via blog.ov1d1u.net (in Romanian)

0 comments

» read more....
How To Load App Tabs On Demand In Firefox 12+

4:15 PM

A while back, Firefox got an option to only load tabs when they are clicked, which makes Firefox a lot faster if you have many open tabs.

But this was only implemented for regular tabs and didn't work for app tabs (pinned tabs), until Firefox 12 which got an about:config option to load app tabs on demand too.

firefox load app tabs on demand

So if you're using Firefox 12+ (Firefox Beta, Aurora or Nightly) and want app tabs to load only when clicked, type "about:config" in the Firefox location bar, then enter:
browser.sessionstore.restore_pinned_tabs_on_demand
in the search box and double click it (or right click it and select "Toggle") so it's value becomes "true".

firefox dont load tabs until selected

This won't work unless you also set regular tabs to load on demand so in the Firefox Preferences, on the "General" tab, make sure "Don't load tabs until selected" is checked.

Now restart Firefox and the app tabs should only load when selected, just like regular tabs.

0 comments

» read more....

Download SopCast For Android (P2P App To Watch TV Channels Online)

10:51 PM

Sopcast player Android

Sopcast Player, the P2P streaming application that allows you to watch various TV channels online, is now available for Android, allowing you to watch TV on your Android smartphone or tablet.

SopCast for Android is currently in beta and doesn't support all the features the desktop application does; for instance, you can't edit the server list, manually add a TV channel or open sopcast URLs. But the default TV channel list is pretty ok for most people.


SopCast for Android lets you see the defaultTV channel list and play any TV channel available in the list, log in using your account or anonymously, change the aspect ratio and that's about it.

In my test, the application worked great on my old HTC Desire HD running Android 2.3.5. Unfortunately I couldn't test it on newer Android devices but according to it's description, it should work on any device running Android 2.2+.

Main SopCast for Android features according to its official webpage:
  • Powered by latest SopCast P2P engine, supports all SopCast P2P channel types.
  • Play local videos (supports most audio and video file types)
  • Low CPU usage
  • Memory buffering

Download SopCast for Android


SopCast for Android is not available in the Google Play Store, but you can download the .apk from one of the links below:
Sopcast android qr code


To install SopCast Player (there are 2 SopCast applications available: TV Maxe and SopCast Player) in Ubuntu, see this post: Install SopCast Player In Ubuntu 11.10 Oneiric Ocelot

* the download is very slow right now using the official download link so I've added an alternate download link.

Thanks to Linux und Ich for the news!

0 comments

» read more....

Read-Me: Google Reader Desktop Application With Unity Integration

4:42 PM


Read-Me is a Google Reader desktop application that doesn't come with many features and instead, it tries to improve the readability.


The application features an interesting interface with partially hidden javasacript buttons that show up on hover (they can be completely hidden by clicking the top left button) and it also incorporates some of the Google Reader web interface features: you can share articles on Twitter, Read it Later or by email, it uses the same keyboard shortcuts (j to go to the next item, k for the previous item, etc.) and more.

Recently, Read-Me has received Unity support so it now displays the number of unread items and a progress bar in the Unity launcher and it also incorporates quicklists:


One thing that I'd really like to see in Read-me is offline support. This feature would make it a lot more useful, at least for me, as I'd be able to use it while travelling. Another missing feature is the lack of support for selecting a folder or a single feed to read.

In the future, Lorenzo, the Read-Me developer, plans to add Ubuntu Messaging menu support so you can easily see new unread item titles while the application runs in the background and can easily be opened from the Messaging menu. Ubuntu Messaging Menu will also be supported by Google Reader Indicator, which will later on be completely incorporated into Read-Me.


Install Read-Me in Ubuntu


Ubuntu 12.04 Precise Pangolin users can install Read-Me from its PPA:
sudo add-apt-repository ppa:atareao/read-me
sudo apt-get update
sudo apt-get install read-me

There are no packages for Ubuntu 11.10, but you can still install Read-Me in Oneiric. Firstly, add the Atareao main PPA (required for a newer GNOME Keyring package):
sudo add-apt-repository ppa:atareao/atareao
sudo apt-get update

Then you can manually download and install the Precise Read-Me .deb in Oneiric.

To use Read-Me simply enter your username and password and all your unread Google Reader items will show up in the application so you can start reading them immediately.

Report any bugs you may find @ Launchpad.

0 comments

» read more....

Install Tribler In Ubuntu Via PPA (Decentralized Bittorrent Application)

12:44 AM

tribler bittorrent ubuntu

Tribler is a cross-platform, decentralized Bittorrent application which means it doesn't require any torrent website to find and download content. Another cool feature is that you can stream videos directly, without having to fully download them firstly (only with VLC 1.1.x for now).

We simply don’t like unreliable servers. With Tribler we have achieved zero-seconds downtime over the past six years, all because we don’t rely on shaky foundations such as DNS, web servers or search portals.

Tribler is not new, but a recent TorrentFreak article titled "Tribler Makes BitTorrent Impossible to Shut Down" made it a lot more popular than it used to be, causing the main page to be taken offline (the download page is still there).

The recent Tribler popularity also resulted in more frequent updates by its developers so I though I'd make a PPA so Ubuntu users can easily get updates without having to manually check for and download new versions. You don't have to use the PPA, as Tribler offers .deb packages for download, but you won't get any automatic updates.


Install Tribler in Ubuntu via PPA


The official Tribler .deb package comes with VLC as a dependency. Using the package in the PPA, VLC is not a strict dependency but just a recommended package so you're not forced to install VLC. VLC is used to stream videos but this feature only works with VLC 1.1.x (it didn't work with the latest VLC 2.0 in my test).

Also, even though the package on the official Tribler website is said to only work with Ubuntu 11.04 and 11.10, I've uploaded packages for all Ubuntu versions between 10.04 and 12.04. And because VLC 1.1.0 is not a dependency, the package installs just fine on older Ubuntu versions which don't have VLC 1.1.0 in the repositories. I've tested it on Ubuntu 10.04, 11.10 and 12.04 and Tribler seemed to work just fine, but if it doesn't work properly for you, there's not much I can do.

To add the PPA and install Tribler in Ubuntu 12.04, 11.10, 11.04, 10.10 or 10.04, use the following commands:
sudo add-apt-repository ppa:webupd8team/tribler
sudo apt-get update
sudo apt-get install tribler

For Windows, Mac, direct .deb downloads or source code, see the Tribler download page. There's also an Arch Linux package in AUR.

0 comments

» read more....

Encrypt DNS Traffic In Linux With DNSCrypt (Via OpenDNS)

6:31 PM

DNSCrypt, as its name suggests, encrypts DNS traffic between your computer and OpenDNS, in the same way SSL turns HTTP traffic into HTTPS encrypted traffic.

Initially, DNSCrypt was announced as being available for Mac only for now, but according to an OpenDNS article posted yesterday, the source code for DNSCrypt was published on GitHub when they've released the Mac preview and even though there's no user interface yet, Linux users can already install DNSCrypt.


Why use DNSCrypt?


DNSCrypt encrypts all DNS traffic between your computer and the OpenDNS servers (so you'll be using OpenDNS) and can protect you from man-in-the-middle attacks, spying, resolver impersonation, can prevent Internet service providers from blocking various websites and more.

This is the first tool that encrypts DNS traffic - for instance, TOR encrypts DNS requests, but they are decrypted at the exit node.

It doesn’t require any changes to domain names or how they work, it simply provides a method for securely encrypting communication between our customers and our DNS servers in our data centers.

You can read more about DNSCrypt @ OpenSND DNSCrypt page and on GitHub.


How to use DNSCrypt in Linux


Download DNSCrypt, install it and then run the following command in a terminal:
sudo /usr/sbin/dnscrypt-proxy --daemonize


Then set your DNS server to "127.0.0.1" - to do this under GNOME, go to your Network Connections and select "Edit" and enter "127.0.0.1" under "DNS servers". If you are using DHCP, just select "Automatic (DHCP) addresses only, so you can enter a DNS server. Then, restart your network connection.

You can then check if you're using OpenDNS by visiting THIS link.

To get DNSCrypt to start automatically, you must create an init script. For Ubuntu, see below.

Arch Linux users can install DNSCrypt-proxy via AUR (it includes an rc.d script).


DNSCrypt in Ubuntu


To make DNSCrypt start automatically in Ubuntu, I've created an Upstart script which you can use if you want - download it.

Update: Because in Ubuntu 12.04 there is a local DNS cache running on 127.0.0.1 (dnsmasq), I've updated the script to make DNSCrypt use 127.0.0.2, so you should add "127.0.0.2" as your DNS and not "127.0.0.1" if you're using this script (for any Ubuntu version). Thanks to zzecool for testing it in Ubuntu 12.04!

To install the script, use the commands below (firstly extract the downloaded archive):
sudo cp dnscrypt.conf /etc/init/
sudo ln -s /lib/init/upstart-job /etc/init.d/dnscrypt

And finally, start it with:
sudo start dnscrypt

DNSCrypt should now start automatically when you boot. To stop it, you can use:
sudo stop dnscrypt


Download DNSCrypt (.deb, .rpm and source code available)

0 comments

» read more....

How To Install The Native Spotify Linux Client In Ubuntu (With Fixes)

6:49 PM


Spotify is a music streaming service that comes with a client which supports Microsoft Windows, Mac OS X, Linux as well as mobile devices such as iOS, Android, BlackBerry, Windows Mobile, Windows Phone, S60 (Symbian), webOS and more. The service is only available in a few countries for now, such as USA, UK, Spain, Sweden and more - check out the Spotify website for more info.

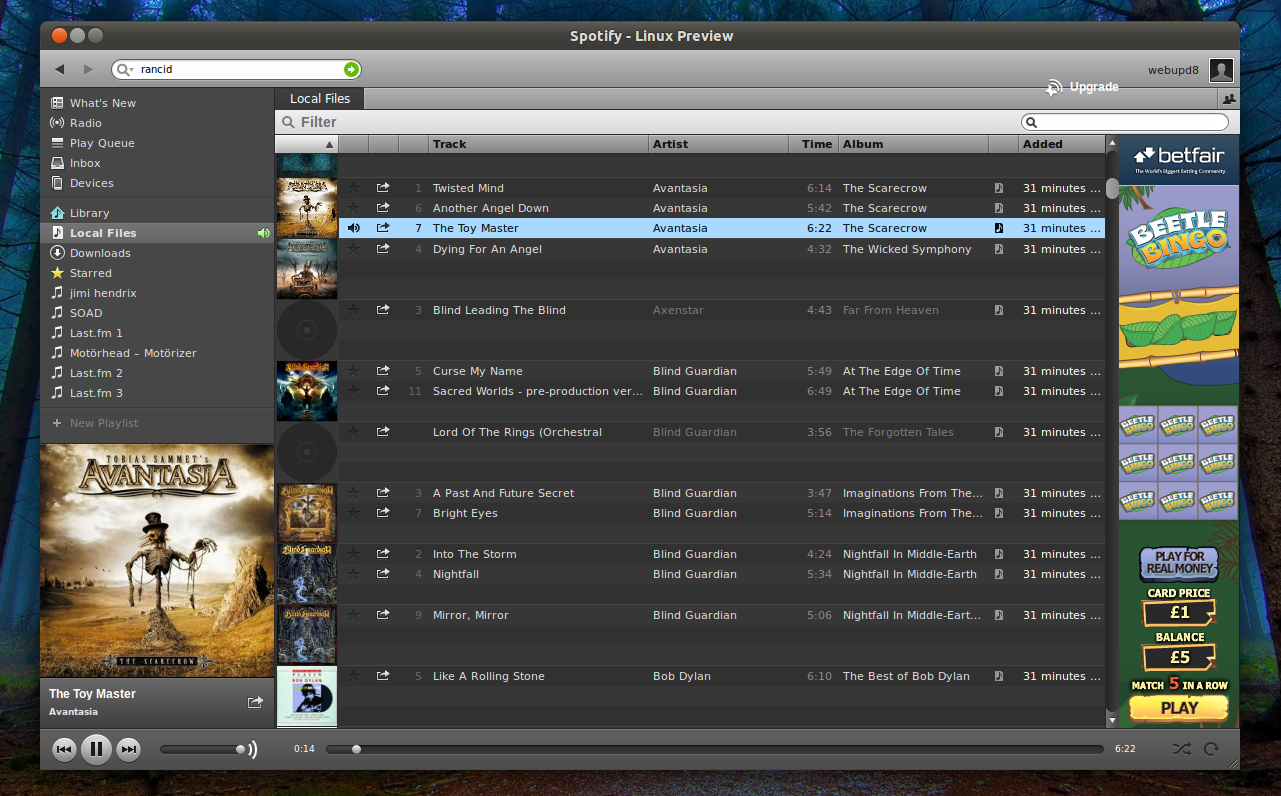
The (official) native Spotify Linux client got support for free accounts recently. Here is how to install it on Ubuntu and fix some bugs such as not being able to play local music in Ubuntu 11.10 Oneiric Ocelot.

Please note that Spotify for Linux is a preview release and is currently unsupported so you may encounter issues!


Install the native Linux Spotify client under Ubuntu


1. Add the Spotify repository (will be used to install Spotify and stay up to date with the latest Spotify versions).

Launch Software Sources using the following command:
gksu --desktop /usr/share/applications/software-properties-gtk.desktop /usr/bin/software-properties-gtk

2. Under Software Sources, switch to the "Other Software" tab, click "Add" and paste the following line:
deb http://repository.spotify.com stable non-free

Once you do this, two repository lines are actually added and the second one (for source code) will display an error when running "sudo apt-get update", so remove this line:
http://repository.spotify.com stable non-free (Source Code)

from the same "Other Software" tab in Software Sources. Once you're done, close the Software Sources window.

3. Import the Spotify repository key and install Spotify for Linux:
sudo apt-key adv --keyserver keyserver.ubuntu.com --recv-keys 4E9CFF4E
sudo apt-get update
sudo apt-get install spotify-client-qt


Spotify fixes for Ubuntu


Spotify has been installed, but if you are using Ubuntu 11.10 Oneiric Ocelot (or newer), you can't play local music, or at least some file types don't work and you'll get a sound decoder error:

"There is a problem with the sound decoder. Spotify can't play music"

This may even occur for some Spotify tracks.

To fix this, you need to install libavutil50, libavcodec52 and libavformat52 from the Ubuntu 11.04 Natty Narwhal repository. To make it easier (thanks to yugnip!), you can get all 3 from here:

Download the .debs above in a new folder, then use the terminal to navigate to it ("cd /path/to/folder") and run:
sudo dpkg -i *.deb


Another annoyance is that Spotify for Linux doesn't display any artwork in the Ubuntu Sound Menu, at least in Ubuntu 11.10. To fix this, use the command below:
mkdir -p ~/.cache/indicators/sound/album-art-cache

Unfortunately I didn't found a fix for the out of place "Upgrade" button.


via PinguyOS forum; thanks to Antoni "Pinguy" for the tip!

1 comments

» read more....

AirDroid: Manage Your Android Device Using A Browser

9:14 AM


AirDroid is a free application that lets you control your Android device from your desktop, tablet or anything else that can run a browser. All you have to do to use it is start the application on your Android device, then open a web browser on your computer and enter the url and password displayed by AirDroid.

The application can be used to read and quickly send messages, browse / download / upload files, preview photos, import or export ringtones, music and lots more.


Probably the best feature for me is being able to quickly send and read messages, replacing AndroidPC which I've used until now. It even displays notifications for new messages, but only in the browser window which isn't exactly useful if the window is minimized so a better way to notify about new messages would be nice (some Chrome extension could do that maybe?). But of course, you can use Android Notifier for that (work on Linux too). 


I also like that it basically integrates multiple apps into one so you don't need a different application to transfer files via WiFi (it automatically creates zip archives when downloading multiple files or folders), to backup your Android apps (which downloads the apk) on your computer, share the clipboard and others.

AirDroid currently only works if the computer and Android device are connected to the same WiFi network. If you don't have a WiFi network however, you can connect them via USB tethering or hotspot mode.


AirDroid features:
  • File management: transfer files between your computer and Android devices, cut, copy, paste, search, rename and delete files on SD card
  • SMS management: send, read, delete SMS messages
  • Photos: preview, set as wallpaper, slideshow, import/export
  • Share clipboard between desktop and your Android device
  • Applications: install, uninstall, backup (downloads .apk files), search
  • Contacts management: create contacts, search, check call logs
  • Ringtones: import from computer, export, preview, customize ringtones for phone calls, notifications and alarms
  • Music: import from computer, export, play, etc.


Some will probably say that Remote Web Desktop is better and indeed, RWD has some extra features like webcam or 3G support, but the AirDroid interface is better in my opinion: it's a lot easier to use as well as better looking. Also, in my test, the image previews loaded a lot faster using AirDroid. By the way, if you've tried both applications, let us know what you think in the comments!


Download AirDroid: Android Market web link or use:


app via Ubuntips

0 comments

» read more....

JDownloader Unity Integration (Speed Counter, Progress Bar And Quicklists)

4:40 AM


JDownloader is a cross-platform download tool which supports most popular file sharing websites and comes with captcha recognition, multi-part downloads, tweak wait times, auto-reconnect, scheduler, automatic file extraction and more.

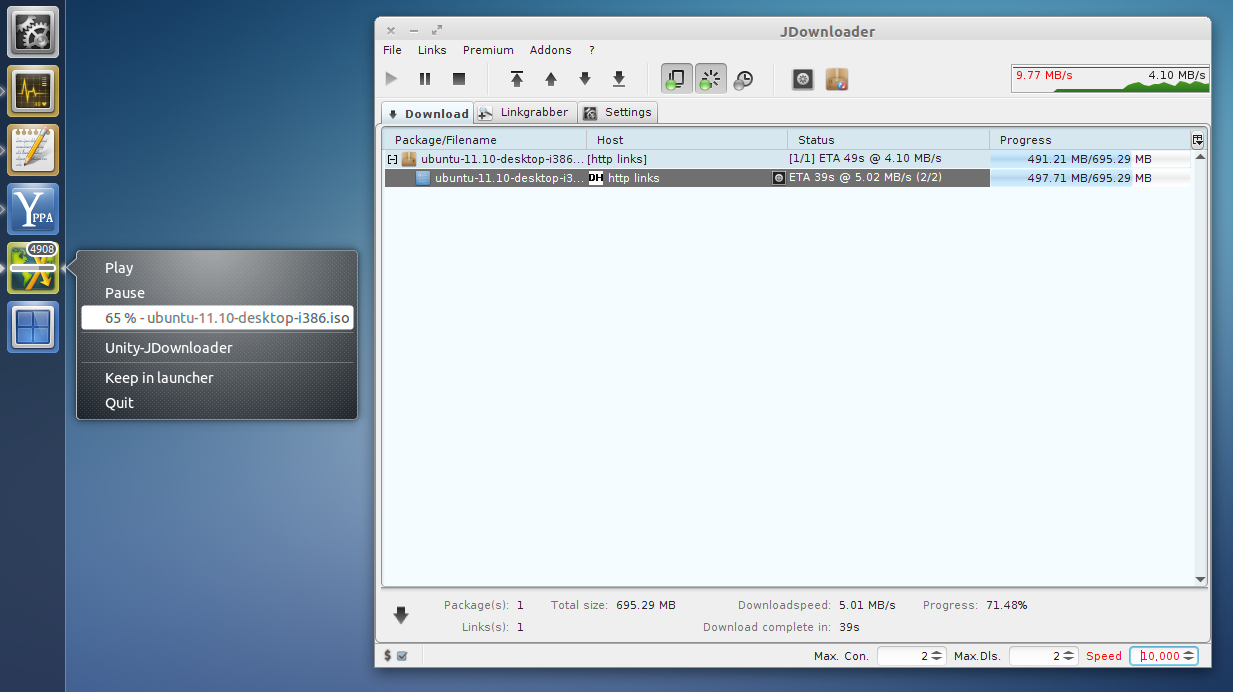
To integrate JDownloader with Unity, you can use a package called Unity-JDownloader which adds quicklists, a speed counter (Unity badge), progress bars as well as notifications for completed downloads.


To install Unity-JDownloader in Ubuntu 12.04, 11.10 or 11.04, use the commands below:
sudo add-apt-repository ppa:narfss/proyectobs
sudo apt-get update
sudo apt-get install unity-jdownloader

Obviously, you'll also need JDownloader - if you haven't installed it already, see Install JDownloader Via PPA Repository.


To get Unity-JDownloader to work, you'll have to enable the JDownloader Remote Control plugin (in the JDownloader settings, enable "JD Remote Control" under "Extensions"):


Then close JDownloader. And from now on, start "Unity-JDownloader" from Dash instead of JDownloader.


More info (in Spanish) @ proyectobs.com.

0 comments

» read more....

Install SopCast Player In Ubuntu 11.10 And 12.04

7:56 PM

I've received quite a few requests to make a post on installing SopCast Player in Ubuntu 11.10 Oneiric Ocelot. So here are two SopCast applications that you can install in the latest Ubuntu:


Install Tv Maxe in Ubuntu


TV Maxe is a SopCast GUI that also supports mms, rmtp and http streams. By default, it comes with a Romanian channel list but more lists (International, UK, France, Danmark, Hungary, Spain, etc.) are available on its wiki page.

TV Maxe

TV Maxe comes with a PPA for Ubuntu Lucid, Maverick Natty and Oneiric - add it and install TV Maxe using the commands below:
sudo add-apt-repository ppa:venerix/blug
sudo apt-get update
sudo apt-get install tv-maxe

Update: the TV Maxe PPA now supports Ubuntu 12.04 Precise Pangolin too.

For other Linux distributions, see the TV Maxe download page (but please note that you'll need to manually install the sp-auth package)


Install SopCast Player in Ubuntu


SopCast Player

2. The LFFL SopCast PPA (ppa:ferramroberto/sopcast) hasn't been updated for Ubuntu 11.10 Oneiric Ocelot. The LFFL Sopcast PPA has just been updated for Oneiric. Add the PPA and install SopCast Player using the commands below:
sudo add-apt-repository ppa:ferramroberto/sopcast
sudo apt-get update
sudo apt-get install sopcast-player

Update: the ferramroberto/sopcast PPA now supports Ubuntu 12.04 Precise Pangolin too.

If SopCast Player segfaults on 64bit, see this work-around (thanks to Ivan for the tip!)


For both applications: please note that on 64bit, you'll have to install a huge list of dependencies because of the libstdc++5 dependency. Also, I've only tested the 32bit packages!

0 comments

» read more....

Network Traffic Monitor (NTM) For Computers With Limited Internet Plans

11:21 PM

NTM Network Traffic Monitor

NTM (Network Traffic Monitor) is an application to use on computers with a limited Internet plan. It can display a complete report for received and transmitted network traffic and automatically disconnect after a certain period of time or after the traffic exceeds the value you set (MB).

The latest Network Traffic Monitor (1.2.5) comes with an Ubuntu indicator, but works just fine under GNOME Shell or XFCE too. Currently there's a small issue with the tray icon in KDE but this should be fixed soon.

By default, NTM will use the "ppp0" network interface which is ok for a modem but if you want it to track your wireless traffic, use "wlan0" instead.

The live traffic info is displayed in a separate window and not in the indicator and that's a bit annoying, but this tiny application gets the job done. One note though: if you switch from a limited data plan to unlimited, remember to switch NTM off and to disable it from starting automatically because it will disconnect your Internet connection when it reaches the threshold without asking for confirmation.


Download NTM (Network Traffic Monitor) (.deb and source files available)

0 comments

» read more....

Install Epiphany 3.2.0 With Web Application Mode In Ubuntu 11.10 Oneiric Ocelot

4:58 AM

Epiphany 3.2.0

GNOME 3.2 got a "web application mode" through Epiphany web browser, allowing you to save websites as web apps. These web apps show up as regular applications in both GNOME Shell and Unity and can be pinned to GNOME Shell's Dash or Unity's launcher, etc. More about them in this post: GNOME 3.2 to get web application mode.

Here is WebUpd8 saved as a web application through Epiphany (using a custom icon) under GNOME 3.2 and Unity:

Epiphany web app Gnome shell

Epiphany web app unity


The latest Epiphany is not available in the Ubuntu 11.10 Oneiric Ocelot repositories so I've created a new PPA for GNOME 3 stuff and uploaded the latest Epiphany 3.2.0 and WebKit 1.6.1 (required dependency).

To save a web page (like Twitter.com, Facebook.com, Gmail or whatever), in the latest Epiphany 3.2.0, select File > Save as Web Application. But please not that for now you can't select an icon or a custom website region for the web app icon so the icons will need further tweaking by replacing the images under ~/.gnome2/epiphany/app-epiphany* (where "app-epiphany*" is a folder stat starts with "app-epiphany" followed by the web app name and some numbers/letters) and then restarting Unity / GNOME Shell.


The Epiphany Browser package in the new GNOME 3 WebUpd8 PPA is the same as in Michael Kuhn's PPA (thanks!), but I've created a different PPA because I want to add some more GNOME 3.2 packages which are not available in the Ubuntu 11.10 Oneiric Ocelot repositories and I wanted to have them all in a single PPA.


Install Epiphany 3.2.0 with web application mode in Ubuntu 11.10 Oneiric Ocelot


Add the PPA and install Epiphany 3.2.0 in Ubuntu 11.10 Oneiric Ocelot using the following commands:
sudo add-apt-repository ppa:webupd8team/gnome3
sudo apt-get update
sudo apt-get install epiphany-browser

0 comments

» read more....

Google Calendar GNOME Shell Integration

4:58 PM

GNOME Shell Google Calendar

GNOME Shell Google Calendar is a tool that integrates Google Calendar into GNOME Shell.

The python script uses GNOME Keyring for storing your password and automatically fetches new Google Calendar events when you click the GNOME Shell calendar on the top panel. For now, you can't configure which calendar is imported (all are used) and there's no configuration GUI (but it's still very easy to use).

You can already do this through Evolution, but using this script, Evolution is not required.


Install GNOME Shell Google Calendar in Ubuntu / Fedora


1. Install the dependencies:

- Ubuntu:
sudo apt-get install git-core python-gtk2 python-dbus python-gdata python-iso8601 python-gnomekeyring


- Fedora:
sudo yum install git-core pygtk2 dbus-python python-gdata python-iso8601 gnome-python2-gnomekeyring

2. Download and run GNOME Shell Google Calendar:
cd
git clone https://github.com/vintitres/gnome-shell-google-calendar.git
cd gnome-shell-google-calendar
./gnome-shell-google-calendar.py

After running it for the first time, you will be prompted to enter your Google Calendar email and password. From now on, the password will be stored in the GNOME Keyring and once logged in, your Google Calendar events should show up in your the GNOME Shell calendar.

3. To get GNOME Shell Calendar to automatically start, open Startup Applications, under "Name" enter "Gnome Shell Calendar" and under command, click "Browse" and select "gnome-shell-google-calendar.py" from the gnome-shell-google-calendar folder in your home directory.

0 comments

» read more....

Dropbox Share Updated For Ubuntu 11.10 [Fedora Installation Instructions Too]

5:37 PM

Dropbox Share is now available for Ubuntu 11.10 Oneiric Ocelot. This is a tool I've created a while back to easily share files or folders using Dropbox and automatically copy their public links to the clipboard.


Dropbox Share comes with a custom Unity launcher as well as two Nautilus scripts (so you don't have to use Unity to run Dropbox Share):

- custom Unity launcher (works with docks too!): just drag and drop some file(s) or folder(s) onto the launcher and a simbolic link is created into your public Dropbox folder (and thus, it doesn't use the double amount of disk space like it would do if you'd copy the files). The public share links are automatically copied to the clipboard so you can easily share it with your friends, etc:

Unity Dropbox Share

- Two Nautilus scripts to share and unshare files - they work just like the Unity launcher, but work in Nautilus and don't require Unity or a dock:

Dropbox Share


Further more, Dropbox Share also adds an emblem to the shared files so you know which files you've shared. And even if you remove a file manually (without using the unshare script) from your public Dropbox folder, the emblems will be correctly updated the next time you share a file thanks to a history of shared files that's built into Dropbox Share.


Also, like I said, Unity Dropbox Share also works with docks such as Avant Window Navigator, Cairo Dock or Docky - just drag the icon to the dock and then drag and drop files to share them using Dropbox. Unfortunately, it doesn't work with DockBarX.


Besides Ubuntu Oneiric support, the latest Dropbox Share 0.5.5 also comes with a new feature: Unity quicklist to re-copy the URL for the last shared file as well as bug fixes.


Here are two old videos demoing Dropbox Share:

- Dropbox Share Nautilus scripts:


- Unity Dropbox Share (Unity launcher):


Install Dropbox Share in Ubuntu


Before proceeding, make sure you've installed Dropbox!


1. Dropbox Share is available in the main WebUpd8 PPA, for Ubuntu 11.10, 11.04, 10.10 and 10.04. Add the PPA and update the software sources using the following commands:
sudo add-apt-repository ppa:nilarimogard/webupd8
sudo apt-get update

2. 

Now, install Dropbox Share (Nautilus scripts):
sudo apt-get install dropbox-share

To also install Unity Dropbox Share (custom Unity launcher), use the following command:
sudo apt-get install unity-dropbox-share

The Unity Dropbox Share icon isn't automatically added to your Unity launcher so you'll have to add it manually it: open Nautilus and navigate to /opt/unity-dropbox-share/, then drag and drop the icon to the Unity launcher or Cairo Dock, AWN, Docky, etc.

Now you can share files or folders using Dropbox by right clicking in Nautilus and selecting Scripts > Dropbox Share or by drag'n'drop onto the custom launcher.


Install Dropbox Share in Fedora


Please note that the emblems do not work in Fedora 15 due to a bug in Nautilus 3 which doesn't read file emblems from metadata (the bug has been fixed in Nautilus 3.1.92 which is in Oneiric).


You firstly need to install Dropbox (obviously)!

1. Install the required dependencies:
sudo yum install libnotify xclip xautomation gvfs libsqlite3x python bzr

2. Download and install Dropbox Share:
cd
bzr branch lp:dropbox-share
sudo cp dropbox-share/bin/* /usr/bin/
sudo chmod +x /usr/bin/{dropbox-index,openpublicfolder,recopy-url,unity-dropbox-share}
mkdir -p ~/.gnome2/nautilus-scripts
cp dropbox-share/{"Dropbox Share","Dropbox Unshare"} ~/.gnome2/nautilus-scripts/
sudo mkdir -p /opt/unity-dropbox-share
sudo cp dropbox-share/etc/* /opt/unity-dropbox-share
rm -r dropbox-share

If you want to use the Dropbox Share launcher in a dock such as AWN or Docky, open Nautilus and go to /opt/unity-dropbox-share and drag the Unity Dropbox Share icon onto a dock.

Now you can share files/folders using Dropbox by right clicking them in Nautilus and selecting Scripts > Dropbox Share or by drag'n'drop onto the custom launcher.


Report any bugs you may find @ Launchpad.

0 comments

» read more....

Integrate Google Music With Ubuntu Sound Menu / Notifications

4:51 PM

Google Music Frame Ubuntu

Google Music is a service that allows you to upload up to 20,000 songs which you can then listen from any computer and even your phone, for free. Google Music is only available in the US for now and requires an invitation (you can request an invite from its main page).

While the Google Music Manager is available for Linux, the service uses a web interface for playing the songs, so there is no desktop integration. But you can get Ubuntu Sound Menu integration and NotifyOSD notifications thanks to an application called Google Music Frame:

Google Music Frame runs Google Music web interface in its own window and provides integration with Ubuntu (sound menu and notifications). It also remembers last session and the current view (album, genre list, etc.).

According to a bug report, it seems the application will also get support for multimedia keys in the future.

To install Google Music Frame (only available for Ubuntu 11.04 Natty Narwhal), use the commands below:
sudo add-apt-repository ppa:janousek.jiri/google-music-frame-releases 

sudo apt-get update

sudo apt-get install google-music-frame

There's also a daily builds PPA for those who like to try new feature faster (but it's not stable). The daily builds PPA also provides Ubuntu 11.10 Oneiric Ocelot packages.

If you encounter any bugs, report them @ Launchpad.


Thanks to Jiří for the tip!

0 comments

» read more....

Opera 11.50 "Swordfish" Has Been Released

4:32 PM

Opera 11.50 Linux

Opera 11.50 "Swordfish" brings an improved user interface (new toolbar icon set, updated statusbar design, removed borders in the address bar, home and fast forward buttons are now optional, new tab fold attention state), password synchronization, improved Opera Mail and Speed Dial as well as better support for CSS3 and HTML5.

The new version also brings a new Presto rendering engine: 2.9 which makes Opera even faster than before (up to 20% faster rendering of CSS and SVG - according to the Opera devs).

For a complete changelog, see THIS page.


0 comments

» read more....

LibreOffice Google Docs Sync Addon "Ooo2gd" Now Lets You Upload Files Without Converting

12:25 AM

A while back we wrote about an OpenOffice addon called "Ooo2gd" which lets you synchronize your documents with Google Docs, Zoho and WebDav servers (either manually - when you're done editing the file, or automatic sync; you can also import files that are already available on the server).


LibreOffice upload to Google Docs

Well, you'll be glad to know that Ooo2gd works with LibreOffice too. Also, the latest Ooo2gd version (3.0.0), released earlier this month comes an option to upload to Google Docs without converting the files (so you can keep the original file format).


Note: Because Google Docs (and its API) is still in beta, sometimes you may not be able to log in to your account. Usually, this happens with Google Apps accounts and it doesn't seep to happen with regular Google accounts but still, if you're getting a login error, most probably this is the case.


Install LibreOffice / OpenOffice.org Google Docs sync addon "Ooo2gd"


Before proceeding, please note that I've tested the instructions below with LibreOffice from the Ubuntu repositories / the LibreOffice PPA so the instructions may not work if you've manually installed the LibreOffice .deb files downloaded from the LibreOffice website!


To use Ooo2gd with LibreOffice or OpenOffice.org in Ubuntu, follow the steps below:

1. You need to install Sun Java from your Linux distributions repositories.

In Ubuntu, enable the partner repository and then search for "sun java6" in Ubuntu Software Center or Synaptic or use the command below to install it:
sudo apt-get install sun-java6-jre sun-java6-plugin

2. For LibreOffice, install "libreoffice-java-common":
sudo apt-get install libreoffice-java-common

For OpenOffice.org, run the command below:
sudo apt-get install openoffice.org-java-common

3. Close LibreOffice / OpenOffice, download the latest ooo2gd in your home folder (~/) and run the following command in a terminal:
unopkg add ~/ooo2gd_3.0.0.oxt


LibreOffice Google Docs sync

Once installed, open Libreoffice Calc, Writer, etc. and you should see a new floating toolbar which you can use to upload your documents to Google Docs, Zoho or a WebDav server.

I recommend using your full email address as the username for Google Docs because in my tests, using the username only sometimes fails.

Now use the new toolbar (which you can drag to your main toolbar) to sync files with Google Docs or Zoho - once you click the "upload" button, a dialog will pop-up and you'll have to enter your username and password. There are also some options available here, like keeping the files in sync (automatically), convert to Google Docs format, etc.

If you're not seeing the floating toolbar or you've encountered some other issue when installing Ooo2gd, check out the known issues page.

0 comments

» read more....

Unity Mail Displays GMail Unread Count On The Unity Launcher

6:05 PM

Unity Mail

Update: Unity Mail Gets GNOME Keyring Support, Graphical Configuration Dialog

Unity Mail is a new application for Unity to display the unread email count on the Unity launcher as well as new mail notifications using NotifyOSD.

The application works with any IMAP4-compatible server, but the quicklists currently work with Gmail only (so you'll have to edit the launcher if you want quicklists for a different mail service).

Unity Mail even has multiple accounts support but it has one drawback: the passwords are currently stored in plain text. On the other hand, Pidgin also stores the passwords in plain text and yet a lot of people use it anyway because if someone has physical access to your computer, he can do pretty much anything he wants. That of course doesn't mean the password shouldn't be stored in the keyring but this is the first Unity Mail release so hopefully it will use the GNOME Keyring in the future (I've submitted a bug about this already).


Install Unity Mail


Add the PPA and install Unity Mail using the commands below:
sudo add-apt-repository ppa:mitya57/ppa
sudo apt-get update
sudo apt-get install unity-mail


Configuring Unity Mail


1. The icon doesn't show up in Dash for me, I really don't know why. So open Nautilus and go to /usr/share/applications/, look for "Unity Mail" and drag and drop the icon onto the Unity launcher. After an update, Unity mail is automatically added to the Unity launcher when you run it.

2. Now press ALT + F2 and enter: "unity-mail" (you can also run this in a terminal) - at this point you'll get a notification that the config file is invalid or missing. Never mind that, this command created the initial config file which you must edit and add your Gmail username and password so open a terminal and copy/paste this:
gedit ~/.config/unity-mail.conf

The config file is pretty much self-explanatory: you must uncomment the "login", "password" and "host" lines (uncomment = remove the "#") and add your username and password. Once you're done, the file should look something like this:

### Uncomment the following lines and edit them
[Account info]
Login=YOUR_GMAIL_USERNAME
Password=YOUR_GMAIL_PASSWORD
[Server info]
Host=imap.gmail.com

3. When you're done, save the file and press ALT + F2 again and run "unity-mail" again. That's it, now the mail icon you've added to the launcher under step 1 should now display a badge with your unread mail count. You'll also get NotifyOSD notifications each time you receive a new email.

Unity-Mail will be automatically added to your startup applications so you don't have to add it manually.


Optional: If you want to add another account, create a new file called "unity-mail.1.conf" in the ~/.config folder:
gedit ~/.config/unity-mail.1.conf

And use the same configuration as in the first unity-mail.conf file (but obviously, use a new username and password). For even more accounts, create ~/.config/unity-mail.2.conf, ~/.config/unity-mail.3.conf, etc.


Report any bugs you may find @ Launchpad.

Update: Unity Mail Gets GNOME Keyring Support, Graphical Configuration Dialog

0 comments

» read more....